Headers examples
Part 1: Git basics
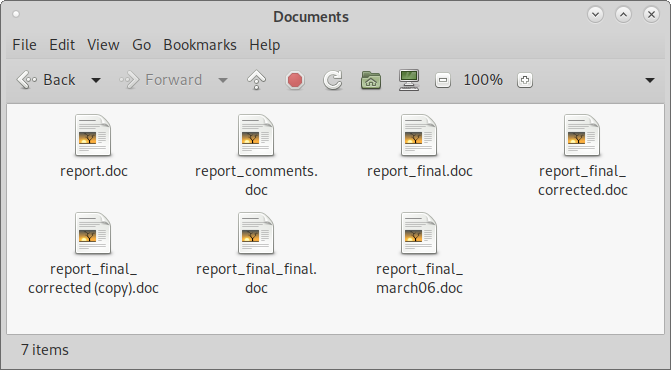
Imagine that you are working on an important document. Once it looks good you send a copy to a colleague, who then sends it back with some suggestions for improvements. You keep both files as reference and unify them in a “final” file, only for you to realize that your “final” file has one wrong figure and you need to fix that. After some more back-and-forth, and before you realize it, your Documents directory is full of slightly-different versions of the same file and you have a hard time realizing which one is the “good” one.
Git is designed to solve this problem. Of all the things that you can do with Git, we'll focus on three specific ones:
- The ability to store multiple versions of a file across time and to switch easily between them
- The ability to work in parallel with other people and to painlessly bring your work together
- The ability to keep track of multiple parallel versions of a file that, for some reason, cannot be unified into one yet.
This tutorial is designed to teach you how to use Git to achieve these three objectives.
But first, some technical details
There are two topics that this tutorial doesn't cover: how to install Git, and how to deal with whatever the authentication method of the month in GitHub/GitLab is. For instructions on installing Git there is no better starting point than the official Git website. As for the authentication, this tutorial will simply assume that you use a username and password. For a more detailed guide, I'm afraid you'll have to check what your repository provider has to say.
While there are several good graphical interfaces for Git, this tutorial will only use the command line. Graphical tools are good once you know what you want to do, but they abstract many important concepts that we first need to learn. Once you are done with the tutorial, you could consider using something like TortoiseGit to have a graphical interface .
And finally, there is a lot of complexity to Git, and explaining all of it at once can be overwhelming. For this reason this tutorial will often ask you to ignore certain directories and/or command outputs. But don't worry: by the end of the tutorial all of it will have been explained.
First steps
In this tutorial we will follow Sarah. She works as a chef for a fancy restaurant, and has finally decided to digitalize her recipe book. She would also like to collaborate with other chefs making new recipes, and is particularly interested in keeping multiple versions of the same dishes (such as her vegan paella and her salt-free chicken soup recipes) up-to-date.
The first core concept we’ll learn is a repository, or repo for short. For our purposes, a repository is a
special directory that keeps a detailed log of everything that happens to each file in it.
Creating a new repository is easy. All Sarah needs to do is to go into her target directory and type:
$ git init .
Initialized empty Git repository in <your directory>/.git/
This empty directory should now contain a (hidden) directory called .git where Git stores all of its information.
Users rarely need to modify files in this directory by hand, and therefore this tutorial will pretend that it doesn't exist.
Now that Sarah has a repository, we can ask Git if there’s anything we should worry about right now with the git status command.
This command gives us an overview of what’s going on at any time, and will be very useful throughout this tutorial.
$ git status
On branch master

No commits yet

nothing to commit (create/copy files and use "git add" to track)
Unsurprisingly, since we haven’t done anything yet there’s not much for Git to do. Nonetheless, Git lets us know that…
- … we are in a so-called
branchnamed "master" (or "main" in some versions). This will be important later, but you can ignore it for now. - … there is nothing to
commitand there are nocommitsyet, and - … we are ready to keep track of files
When we commit (verb) one or more files we are explicitly keeping track of their status at this point in time. We call this snapshot
in time a commit (substantive), and there’s no better way to understand them than to see them in action.
Let’s create a new file recipe.txt inside our repository containing Sarah's first recipe:
Poached egg
===========
Ingredients:
  * 1 egg

Instructions:
  * Submerge the egg in boiling water for 3-4 minutes.
If we use git status now, Git will let us know that something has changed:
$ git status
On branch master

No commits yet

Untracked files:
  (use "git add <file>..." to include in what will be committed)

	recipe.txt

nothing added to commit but untracked files present (use "git add" to track)
As you can see, we now have untracked files. An untracked file is a file that is located inside our repository but, at the same time, Git
was never told to keep track of its status. If Sarah wants Git to keep track of this file, she needs to use the git add command:
$ git add recipe.txt
It may seem as if nothing happened, but the git status command tells another story:
$ git status
On branch master

No commits yet

Changes to be committed:
  (use "git rm --cached <file>..." to unstage)

	new file:   recipe.txt
With one single git add, we have actually performed two tasks at once:
- We added the file
recipe.txtto the repository. From now on, Git will keep track of all changes to this file. - We added this file to the so-called "staging area". What this means is that Git will save the current state of this file in our very next
commit, unless we explicitly tell it not to do that.
Since we just have this one file, we will now create a record of the state of all files added to the "staging area". In Git terms, we say that we will commit our changes to the repo:
$ git commitOnce we type this command, a text editor opens and asks us to type a description of the changes we are saving. I have added Sarah's description at the bottom to make it easier for us to read, but most programmers write it at the top. Feel free to write your description anywhere you want.
# Please enter the commit message for your changes. Lines starting
# with '#' will be ignored, and an empty message aborts the commit.
#
# On branch master
#
# Initial commit
#
# Changes to be committed:
#       new file:   recipe.txt
#

Adds the first version of my poached egg recipe
A lot has been written about how to write commit messages. This tutorial uses short messages of no more than one sentence for educational purposes, but I encourage you to dedicate a bit more time. Typically, a one-sentence title followed by an optional, longer description is ideal. I also prefer to start my commits with a verb in present tense.
Once we write this description, Git lets us know that all went well.
$ git commit
[master (root-commit) e809846] Adds the first version of my poached egg recipe
 1 file changed, 7 insertions(+)
 create mode 100644 recipe.txt
Ignoring the numbers between brackets for the moment, Git is showing us which changes are part of this commit. In this case we added a single file
with 7 lines of text in it, but it could have been multiple files.
If we now type git status again we’ll notice that Git has gotten less verbose:
$ git status
On branch master
nothing to commit, working tree clean
This is to be expected: all of our changes have been committed to the repository, and therefore there’s not much left to do.
Before we move forward, let’s make a quick recap of all the states in which a file can be - in your daily work you typically only need to think about "tracked" and "modified", but it's good to know the main ones:
                           git add
    +--------------------------------------------------+
    |                                                  |
    |                 file changes                     |
    |             +----------------+                   |
    |             |                |                   |
    |             |                v     git add       v
Untracked     Tracked         Modified -----------> Staged
                  ^                                    |
                  |                                    |
                  +------------------------------------+
                                git commit
- A completely new file is
untracked. Git doesn’t know anything about this file, and will never remember its changes. This is typically the case for temporary files that you have no interest in remembering and for files that you created just now and haven'taddedyet. It's also the case for files that you don't want other people to see such as files containing your password. Never add a password to Git unless you want the entire world to know it forever. - If you use the
git addcommand with a file, you move it to thestaging area. This means that the current state of the file will be saved the next time we run thegit commitcommand. You typically do this when you are either happy about the state of the file or are about to do something dangerous and would like to have a backup. - After you add a file, its state changes to
tracked. Git will remember the entire history of this file since its addition, but only when we tell it to do so via acommit. - If you modify a tracked file, its state changes to
modified. This means that Git knows the file has changed since the last time and will tell you so, but it won’t do anything about it until you tell it to. Otherwise Git could save changes you didn't want to keep, and no one wants that.
Let’s see what happens when we modify out recipe (modifications in yellow):
Poached egg
===========
Ingredients:
  * 1 egg

Instructions:
  * Submerge the egg in 80°C water for 3-4 minutes.
$ git status
On branch master
Changes not staged for commit:
  (use "git add <file>..." to update what will be committed)
  (use "git checkout -- <file>..." to discard changes in working directory)

	modified:   recipe.txt

no changes added to commit (use "git add" and/or "git commit -a")
Git is now telling us a lot of information, so let’s go step-by-step:
- the file "recipe.txt" has been modified.
- if we want to keep the changes we made on this file, we can use
git add <file>and Git will stage this file to be committed. - if those changes were a mistake and/or we changed our mind, we can go back to the last committed version of the file with
git checkout -- <file>. Think of it as an "undo" command for files that haven't been committed yet. Part 5 talks about undoing changes in more detail. - in addition to using “git add”, we can use
git commit -ato stage all modified files for commit at once.
Let’s go ahead and commit the current version of the file. We can use the -m flag to give the commit description right now without
going through the text editor:
$ git commit -a -m "Lowers the required temperature"
[master 2045685] Lowers the required temperature
 1 file changed, 1 insertion(+), 1 deletion(-)
Git internals
Now that you know how to commit files, it is time to talk about what a commit actually is. The best way to think about them is to picture a commit as a list of all the differences between the previous version and the new one.
Here’s an example: let’s add some salt to our recipe:
Poached egg
===========
Ingredients:
  * 1 egg
  * Salt

Instructions:
  * Submerge the egg in 80°C water with salt for 3-4 minutes.
  * Add salt to taste.
The command git diff can tell us what has changed between the last commit and the current version of our file(s):
$ git diff
diff --git a/recipe.txt b/recipe.txt
index 3b35ae1..2de4951 100644
--- a/recipe.txt
+++ b/recipe.txt
@@ -2,6 +2,8 @@ Poached egg
 ===========
 Ingredients:
   * 1 egg
+  * Salt

 Instructions:
-  * Submerge the egg in 80°C water for 3-4 minutes.
+  * Submerge the egg in 80°C water with salt for 3-4 minutes.
+  * Add salt to taste.
This format is rather cryptic, but it’s not difficult to understand. What Git is telling us here is that the file recipe.txt was
modified, with some lines going away (those marked with -) and some new lines coming in (those marked with +).
Note that when you edit a line Git takes that as if you had erased it entirely and replaced it with a new one.
A commit, then, can be understood as this specific set of changes to this specific set of files in our repo.
$ git commit -a -m "Adds salt everywhere"
[master ca0e2e3] Adds salt everywhere
 1 file changed, 3 insertions(+), 1 deletion(-)
Because we are thinking of a commit as a set of changes, a commit only makes sense if we also take into consideration the previous version of the file.
And because that version depends on a previous one, we can visualize our commits as a chain going back to our very first file.
We can see this chain with the git log command:
$ git log
commit ca0e2e38f38757e704bdc528f661e0d1e07fe23c (HEAD -> master)
Author: Sarah Arleen
Date:   Tue Sep 7 18:12:49 2021 +0200

    Adds salt everywhere

commit 2045685293363b992885d66332767bf6fb6507a7
Author: Sarah Arleen
Date:   Tue Sep 7 18:10:45 2021 +0200

    Lowers the required temperature

commit e80984624024e08568f05e50cbbb1f9054ab1fde
Author: Sarah Arleen
Date:   Tue Sep 7 18:08:03 2021 +0200

    Adds the first version of my poached egg recipe
This command is showing us a lot of information about a commit:
- the ID (or “hash”) of the commit in its long form (you can use only the first seven characters),
- who made the commit and when,
- the description of the commit,
- the latest commit also shows a (HEAD -> master) field.
HEADmeans "this is the commit where your next work will be added", whilemasterrefers to our currentbranch. We will talk about branches in Part 4.
If we want to see an old version of our file, we can use git show and a specific commit hash (or, in this case, the first seven
characters of the hash) to go back in time:
$ git show 2045685:recipe.txt
Poached egg
===========
Ingredients:
  * 1 egg

Instructions:
  * Submerge the egg in 80°C water for 3-4 minutes.
These commit hashes are how Git identifies every individual commit. We have seen them before: the short version of the hash is shown in brackets after every commit. We’ll be using these hashes in our more advanced lessons, but otherwise they are yet another detail that we can safely ignore for now.
One tip worth keeping in mind: you can add an easy-to-read tag to a commit and use it instead of its hash:
$ git tag v1.0 2045685
$ git show v1.0:recipe.txt
(same output as above)
If you want to see all existing tags, the command git tag will list them all. These tags will also show up in the output of git log.
$ git tag
v1.0

$ git log
commit ca0e2e38f38757e704bdc528f661e0d1e07fe23c (HEAD -> master)
Author: Sarah Arleen
Date:   Tue Sep 7 18:12:49 2021 +0200

    Adds salt everywhere

commit 2045685293363b992885d66332767bf6fb6507a7 (tag: v1.0)
Author: Sarah Arleen
Date:   Tue Sep 7 18:10:45 2021 +0200

    Lowers the required temperature

commit e80984624024e08568f05e50cbbb1f9054ab1fde
Author: Sarah Arleen
Date:   Tue Sep 7 18:08:03 2021 +0200

    Adds the first version of my poached egg recipe
git show is convenient if we want to see an older version of a single file, but what if we want to see the state of
the entire project instead? Here I have good and bad news. The good news are that there is a single command that does exactly that.
But you'll have to wait until Part 5, "Revisiting the past", or I risk losing you with too many concepts at once.
Part 1 quick review
- git init <directory>
- Creates an empty Git repository in the given directory.
- git status
- Shows information about what has changed in your repository since your last commit.
- git add
- Tells git to start keeping track of a previously-unknown file.
- git commit
- Saves the current state of the files in your repository. This snapshot in time receives an identifier called a
hash. - git tag
- Adds a human-readable label to a specific commit so we don't need to remember it's
hash. - git diff
- Shows what has changed between two commits. If we don't give it any arguments, it shows what has changed between the last commit and now.
- git show
- Shows the content of a specific file at a specific point in time.
This concludes our first part. With the commands we’ve seen until now you can keep track of file changes, see their older versions, and add little tags to those versions you may want to revisit in the future.
In Part 2 we’ll talk about how to collaborate with other users, how to work in parallel, and how to solve collaboration issues.